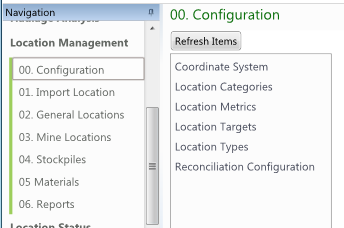
Data which can be viewed, adjusted, deleted or added will be presented within Data Management grids will be listed under a pane. Each item listed in the pane represents a table within MiiNT.

In the above example, data in the listed tables can be managed ie Coordinate Systems and Location Types.
Select the table you wish to alter from the pane. A Loading dialog will be displayed prior to a grid appearing to the right listing all the records currently maintained within the chosen table.
Filtering, Grouping and Sorting can be used to narrow down the number of records displayed.
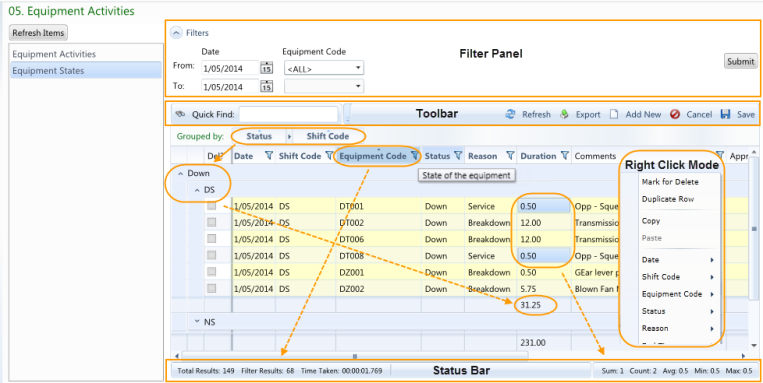
In the above example records from the Equipment States table has been displayed for the selected date range. The results have been grouped by Period Code within Status, with additional filtering on the Equipment Code column.
The Totals row in the Status bar at the bottom of the data grid displays the number of records extracted, the number of filtered records and the sum, count, average, minimum and maximum values for the highlighted Duration values.
Only column values highlighted with a yellow background can be adjusted.
The following features can be used for Data Management:
| Action | Description |
|---|---|
|
Filter Panel (optional and may contain a number of different filters). |
|
|
|
Select the Hide Filters button to collapse the Filters panel. |
|
|
Select the Hide Filters button to expand the Filters panel. |
|
|
Enter a valid date or use the calendar drop down to display the calendar to select required date. |
|
|
Select the Submit button to refresh the data for the selected filter values. Will need to be used to reflect any changes to the filter values. |
|
Toolbar |
|
|
|
Use the Quick Find field to locate required records whilst you type. Refer to the Quick Find section for more information on how to quickly locate records. |
|
|
Use the Add New button to create a blank record at the top of the grid. Refer to the Add Data Management Records section for more information on how to add records. |
|
|
Use the Cancel button to cancel any additions and editing of records. |
|
|
Use the Save button to save any changes, including newly created records. Note: The Save button must be selected to save changes. |
|
|
Use the Refresh button to refresh the data with any changes made to the data using the existing filters. Note: The Save button must be selected to save changes prior to selecting the Refresh button. |
|
|
Use the Export button to export the current result in the data grid to one of the selected outputs. Refer to the Exporting section for more information on available exporting formats. |
|
|
Select the drop down arrow to see a list of toolbar options that are currently not visible. This occurs when the width of the grid is reduced. |
|
Grouped By |
|
|
|
Place column headers here to group the records by the column values. Refer to the Grouping section for more information on how to group records by a column. |
|
|
The Status and Period Code column headers have been moved to group by Period Code within Status. |
|
Grouping sub totals |
Displays a sub total for each grouping. |
|
Headers |
|
|
|
A tooltip containing a description for the field will be displayed when you hover over a column header. Note: This tooltip can be used to provide meaningful information on the fields. |
|
|
Columns can be moved by dragging the column header to another spot in the headers row. |
|
|
To Filter data select the Filter icon to the right of the column you wish to filter on, to display the Filter options. Refer to the Filtering section for more information on how to filter records. |
|
|
Click on the header to sort in alphabetic order. Refer to the Sorting section for more information on how to sort records. |
|

|
Mandatory fields require a value to be entered and are identified by their column headers with a bold font. In the example to the left the Active field is mandatory whilst the Fleet field is optional. |
|
Mark For Delete |
Use the Mark For Delete option to select the Del? check box for rows with selected cells by right clicking and selecting the option. Refer to the Delete Data Management Records section for more information on how to delete records. |
|
Duplicate Row |
Use the Duplicate Row option to duplicate rows for selected cells by selecting a range of cell, right clicking and selecting the option. The duplicated rows will be placed below the row that was right clicked on. Refer to the Add Data Management Records section for more information on how to duplicate records. |
|
Copy |
Use the Copy option to copy the contents of selected cells within a single row by right clicking on a cell within the row and selecting the option. The copied values will then be available to paste into the same cells of other rows where any cells have been selected. Alternatively, Ctrl-C can be used to copy from selected cells. Note: This option is only available when cells from a single row have been selected. |
|
Paste |
Use the Paste option to copy values from the clipboard and paste to the same cells (fields) in the rows of any selected cells by right clicking and selecting the option. Alternatively, Ctrl-V can be used to paste to selected cells. Note: This option will only be enabled when values have been copied. |
|
Date, Shift Code, Equipment Code, Status, Reason, etc. |
The Right Click context option displays the fields available for the selected data management query that may be changed. For the Equipment States data management query the Date, Shift Code, Equipment Code, Status & Reason are some of the fields that may be changed using the Right Click menu option to select the field that you would like to change. Note: It is possible to apply the change value of a field to several selected rows. |
|
Status bar |
|
|
|
A count of the total number of records extracted for the selected filter values. |
|
|
A count of the number of records being displayed after column filtering has been applied. |

|
Time taken to extract the results. |
|
|
Displays the sum, count, average, minimum and maximum values for any highlighted numeric fields. |
|
Deletions |
|
|
|
The Del? check box is used to mark records to be deleted when the Save button is selected. The Right Click > Mark For Delete option can be used to mark multiple records to be deleted. Refer to the Delete Data Management Records topic for more information on how to delete records. |
|
Keyboard Keys |
|
|
Tab |
Select the Tab key to move from field to field across the grid and to the next record. |
|
Esc |
Press the Esc key once to cancel the editing of a field. Press the Esc key twice to cancel the adding of a new record. |
|
Fields |
|
|
Data Entry |
Whilst typing a value into a field, a lookup of existing values will be filtered down, allowing you to select one of the values as an alternative to typing the full value, or you can press the Tab key to automatically select the 1st value from the lookup as you move to the next field. Note: This only occurs on text fields. |
|
Read Only |
Non highlighted fields are read only and cannot be adjusted.
|
|
Editable |
Only fields highlighted with a yellow background can be adjusted.
|
|
Validation |
Field validation will occur when you move away from the field. Refer to the Data Management Validation topic for more validation information. |
|
Lookups |
All text fields will contain a lookup of existing values.
|
![]()
To Filter data select the Filter icon to the right of the column you wish to filter on to display the Filter options. From where there are various ways to filter the data on.
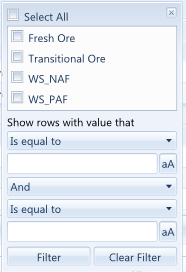
The data will be filtered as you select the required filter values and the column header will be highlighted blue.
Note: The column header is not highlighted when filtering is applied to the General Locations and Mining Locations grids.
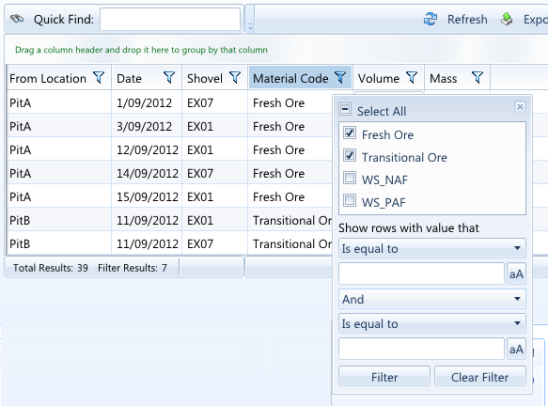
To remove the Filter, simply select the Clear Filter button or remove previously selected filter values.

To Group data simply drag a column heading to the Grouped by area above the headings row.

To remove the Grouping, simply drag the column heading from the Grouped by area back to the column heading area.
Note: Report queries will be automatically grouped by any groupings set within the query and the column heading(s) will be placed into the Grouped by area.
The records may be sorted into ascending or descending order by the values of the selected column. It is also possible to sort additional column values within the previously selected column values.
Click on any column heading to sort the records in ascending order by the column values. The background colour of the heading will be changed and a little triangle will appear above the column heading. Click on the column heading a second time to sort the records in descending order by the column values. Click on the Column heading a third time to remove any sorting.
After sorting the records by a column select another column whilst holding the Shift key to sort the records by the 2nd selected column within the 1st selected column.
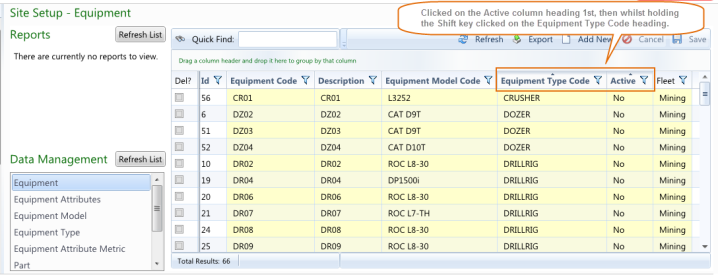
In the example above the equipment records are sorted by Equipment Type Code within the equipments Active status.

The Quick Find option can be used to quickly locate all records that contain the value that is being entered. Use the icon to clear the entered value.
![]()
It is possible to export the results in the following formats:
Note: Any filtering applied to the data grid will be reflected in the exported results.
Refer to the Data Management Queries topic under the Administration Menu for information on creating Data Management Query pages.